I've always wanted to get around to making some blog posts/tutorials. It was Etienne Jacob's tutorials that introduced me to Processing (I previously used HTML Canvas) and inspired me to start posting on Twitter. Now with a few years of Processing under my belt, it seems as good a time as any to give it a shot!
My main goal with these posts is not necessarily to provide instructions, but to introduce a range of topics across math, science, and coding. Through these introductions, I hope to arouse curiosity, provide inspiration, and maybe even teach you a thing or two.
For this inaugural post, we'll be taking a look at subdivisions. The name is pretty self-explanatory; we'll be taking an object (in this case a square) and dividing it into multiple pieces. Of course to make things more interesting, we'll then be dividing those pieces into more pieces, and so on. I chose this topic since it covers a number of concepts including self-referential classes, looping techniques, and the dreaded recursion. Let's get started! Oh and FYI, we'll end up with something like this:
The finished product.
The Div Class
To represent each division (or div) in our system, we're going to need a class. This class will contain the div's properties along with methods to render and iterate the system. To visualize a div, we'll draw a rectangle defined by two x-y coordinates.
class Div {
  // Coordinates defining rectangle
  float x1;
  float y1;
  float x2;
  float y2;

  Div(float x1, float y1, float x2, float y2) {
    // Constructor for first div
    this.x1 = x1;
    this.y1 = y1;
    this.x2 = x2;
    this.y2 = y2;
  }

  void iterate() {
    // Do something
  }

  void render() {
    // Draw rectangle
    rect(x1, y1, x2-x1, y2-y1);
  }
}
Back in our main file, we can use the following code to define and draw our first div:
float border = 50;  // border between main div and frame edge
Div div1;  // initialize first div

void setup() {
  size(800, 800, P2D); // initialize canvas
  // construct first div
  div1 = new Div(border, border, height-border, width-border);
}

void draw() {
  background(200);
  stroke(0);
  strokeWeight(2);
  fill(255);

  div1.render();  // render div
}
Which leads to this very interesting result:

Our initial div. The first of its kind.
Self-Reference
To iterate our system, we are going to split our first div into smaller divs. In other words, our parent div is going to split into multiple child divs. To implement this relationship, we first need to cover the idea of self-reference. Within object-oriented programming, a self-referential object is an object that contains a reference to an object of the same class. In simpler and more familiar terms, each div is going to contain references to its child divs and its parent div. The implementation of this in our class is shown below: (omitting unchanged methods/ constructors)
import java.util.ArrayList;

class Div {
  // Coordinates defining rectangle
  float x1;
  float y1;
  float x2;
  float y2;

  Div parent;  // parent Div object
  ArrayList<Div> children = new ArrayList<Div>();  // list of child Divs
  int childID;  // Index of this div in its parent's child list

  Div(float x1, float y1, float x2, float y2, Div parent, int childID) {
    // Constructor for subsequent divs
    this.x1 = x1;
    this.y1 = y1;
    this.x2 = x2;
    this.y2 = y2;
    this.parent = parent;
    this.childID = childID;
  }
}
The split() Method
To implement the subdivision of our div, we're going to add a split() method. This method should have two arguments: (1) the number of pieces we want to evenly split our div into and
(2) the axis (x or y) that we are splitting along. We will call these inputs nPieces and splitAxis, respectively. To perform the split, we will create a list
of floats, splitRatios, that represent the ratios/percents that we are splitting at. For example, if we are splitting our div into four pieces along the x-axis, this list
would be [0, 0.25, 0.5, 0.75, 1]. These ratios can also be seen as representing the locations of the lines drawn in the direction of the y-axis, as shown in the figure below:

Representation of the split() method. In this figure, a div is split evenly into four pieces along the x-axis. These splits occur at the ratios shown
above (0-1), and are listed at the indeces found in square brackets (0-4). The ratios can be converted into coordinates using the given equation, where 0.5 is replaced
with the desired ratio.
And to calculate these ratios, the following code is used:
splitRatios = new float[nPieces + 1];
for (int i = 0; i <= nPieces; i++) {
  // split evenly into nPieces
  splitRatios[i] = (float)i/nPieces;  // avoid integer division
}
To then convert these ratios into coordinates, we use the equation shown in the figure above, where 0.5 is replaced by the desired ratio, n :
$$x=x_1+n(x_2-x_1)$$
If we are splitting along the y-axis, x1 and x2 are replaced with y1 and y2. The coordinates along the opposite axis are held
constant in either case. Thus, we can construct all i children using the lines:
if (splitAxis) {  // x-axis
  // add new subdivisions as children
  for (int i = 0; i < nPieces; i++) {
    Div newChild = new Div(x1 + splitRatios[i]*(x2-x1), y1,
                           x1 + splitRatios[i+1]*(x2-x1), y2,
                           this, i);
    children.add(newChild);
  }
} else {  // y-axis
  for (int i = 0; i < nPieces; i++) {
    Div newChild = new Div(x1, y1 + splitRatios[i]*(y2-y1),
                           x2, y1 + splitRatios[i+1]*(y2-y1),
                           this, i);
    children.add(newChild);
  }
}
Pieces these two parts together, we get our complete split() method:
void split(int nPieces) {
  // Splits this div into nPieces, stored as child divs

  splitRatios = new float[nPieces + 1];
  for (int i = 0; i <= nPieces; i++) {
    // split evenly into nPieces
    splitRatios[i] = (float)i/nPieces;  // avoid integer division
  }

  if (splitAxis) {  // x-axis
    // add new subdivisions as children
    for (int i = 0; i < nPieces; i++) {
      Div newChild = new Div(x1 + splitRatios[i]*(x2-x1), y1,
                             x1 + splitRatios[i+1]*(x2-x1), y2,
                             this, i);
      children.add(newChild);
    }
  } else {  // similar but for y-axis
    for (int i = 0; i < nPieces; i++) {
      Div newChild = new Div(x1, y1 + splitRatios[i]*(y2-y1),
                             x2, y1 + splitRatios[i+1]*(y2-y1),
                             this, i);
      children.add(newChild);
    }
  }
}
Now, you may wonder why splitAxis was not listed as an argument within the method. This is because we want to split our div in the opposite direction of our parent div.
While it is possibe to split along the same axis, it quickly results in odd-looking divs with extremely large aspect ratios. To avoid this, we will store splitAxis as a
class property. When constructing a child div, we will set splitAxis to be the opposite of the parent's splitAxis value. For our initial div, we will randomly
set splitAxis. The implementation of this is shown below:
class Div {
  ...
  float[] splitRatios;  // ratios representing the location of children
  boolean splitAxis;  // axis on which this div will split
  // True = x-axis, axis False = y-axis

  Div(float x1, float y1, float x2, float y2) {
    // Constructor for first div
    ...
    splitAxis = (random(0,1) < 0.5);  // randomly set
  }

  Div(float x1, float y1, float x2, float y2, Div parent, int childID) {
    // Constructor for subsequent divs
    ...
    splitAxis = !parent.splitAxis;  // opposite of parent
  }
}
render() Recursion
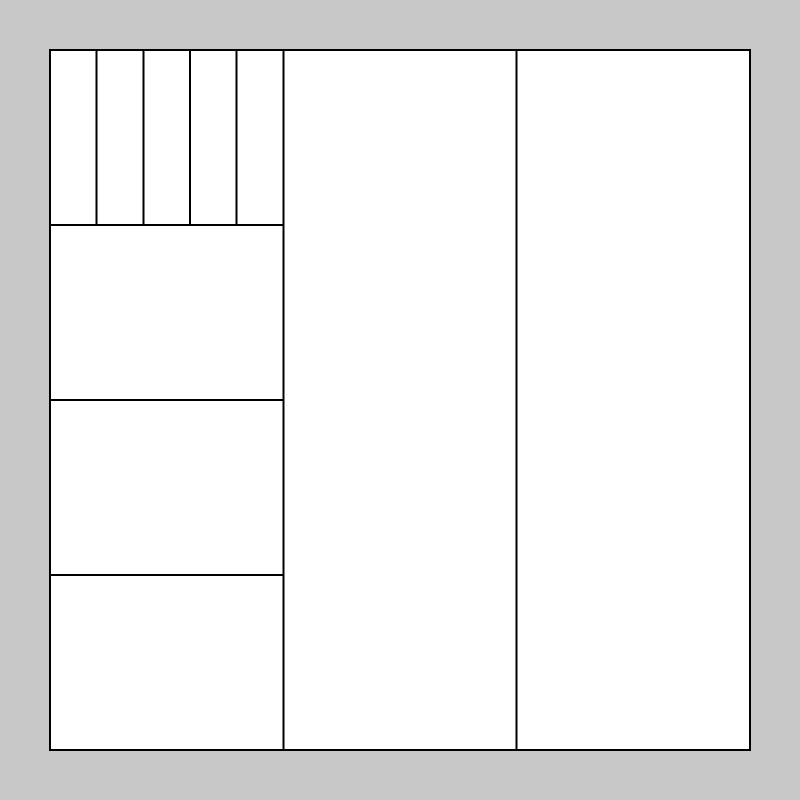
Now to test our method! Let's go back to our main function and split our initial div and some of its children:
void setup() {
  size(800, 800, P2D);
  // construct first div
  div1 = new Div(border, border, height-border, width-border);
  div1.split(3);  // split initial div into three
  div1.children.get(0).split(4);  // split first child into four
  // split that div's first child into five
  div1.children.get(0).children.get(0).split(5);
}
Now let's hit run, and... huh.
An unexpected result. We expect to see the div split into multiple pieces.
What happened here is that we only rendered our initial div. Instead, we should now be rendering every div that doesn't have children. If a div has children, we do not
need to draw it, as the renderings of the children will cover it completely. To implement this, we need to use recursion. Returning to our render() method,
we can add just a few seemingly simple lines:
void render() {
  // Draw rectangle
  if (children.size() != 0) {  // if has children, iterate recursively
    for (Div child : children) {  // for each child
      child.render();  // call this method
    }
  } else {  // if no children, draw
    rect(x1, y1, x2-x1, y2-y1);
  }
}
What's happening here is essentially a queue. When render() is called on a div with children, it adds all of its children to the front of the render queue. If any
of those children have children, they will then add them to the front of the queue. Once a div without children is rendered, it is removed from the queue. The queue is only clear
once all divs without children have been rendered. If we run our main file again, we now get the expected result!
Our intitial div was sucessfully split multiple times. It's now a great-grandparent.
The iterate() Method
Now that we have our methods for splitting and rendering, we need to create a method to generate/split our system for us. That's where the iterate() method mentioned
earlier comes in. The iterate method will decide both when to split a div, and how many pieces to split it into. There are a wide range of approaches to this step, and I encourage
you to try your own. For the chance to split a div, I arbitrarily came up with the equation:
$$P(split)=0.5^{layer}$$
Where layer is the depth of the current div. The chance to split is set to 0 if layer is greater than a class property named maxLayers (which I set
arbitrarily to 6). For the number of splits, I arbitrarily came up with the equation:
$$nPieces=\lfloor 5\cdot(1-\sqrt{x})+2 \rfloor$$
Where x is generated via random(0,1). The weird square brackets represent floor(). We can then use recursion to run iterate() on all divs
without children:
class Div {
  ...
  float layer;
  int maxLayers = 6;

  Div(float x1, float y1, float x2, float y2) {
    // Constructor for first div
    ...
    layer = 0;
  }

  Div(float x1, float y1, float x2, float y2, Div parent, int childID) {
    // Constructor for subsequent divs
    ...
    layer = parent.layer + 1;
  }

  void iterate() {
    // Give each div that doesn't have children a chance to split
    if (children.size() != 0) {  // if has children, repeat recursively
      for (Div child : children) {
        child.iterate();
      }
    } else if (layer < maxLayers) {  // if no children and < max depth
      // chance to split, decreases with depth
      float splitChance = pow(0.5, layer);

      if (random(0, 1) < splitChance) {  // if rolls chance to split
        int nPieces = floor(5*(1-sqrt(random(0,1)))+2);
        // more likely to have less splits (2 min, 6 max)
        this.split(nPieces);
      }
    }
  }
}
Now going back to our main script, we can run iterate() a few times instead of manually splitting our divs:
void setup() {
  size(800, 800, P2D);
  // construct first div
  div1 = new Div(border, border, height-border, width-border);

  for (int i = 0; i < 20; i++) {
    div1.iterate();  // iterate div
  }
}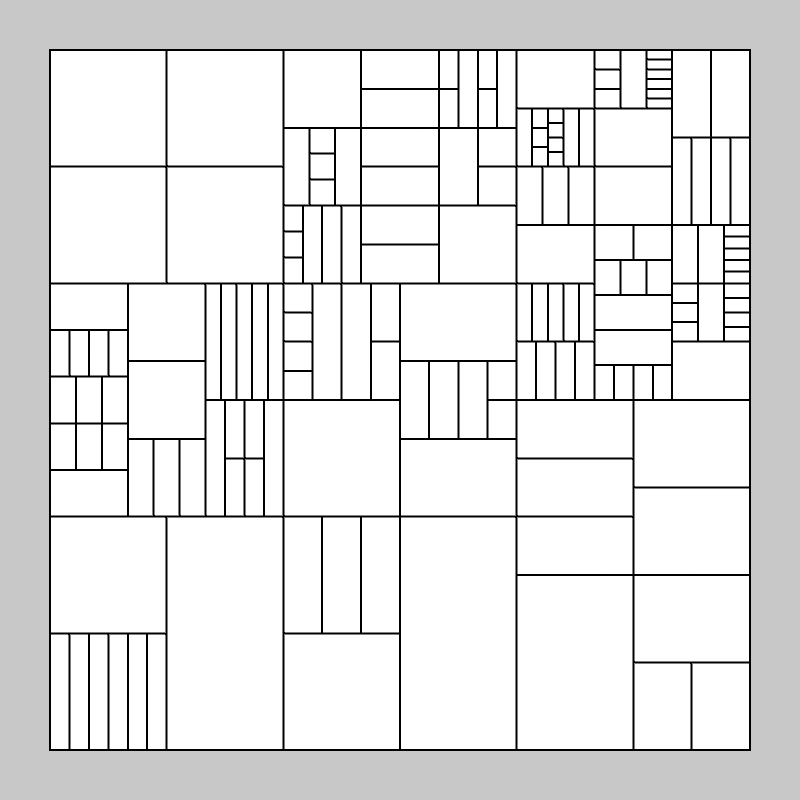
Our initial div was sucessfully split into many pieces using recursion.
Looks great! Now to add some dynamic movement.
Movement
To add movement, we need to adjust the splitRatios of each div with children, then update the position of each div recursively. To adjust splitRatios
we can add a method adjustRatios(). This method will take the original splitRatios for a given div, and adjust them slightly. We have to be careful, however, since
splitRatios[0] and splitRatios[end] must remain 0 and 1, respectively. Also, we must prevent consecutive splitRatios[i] values from
overlapping. For a given splitRatio value (excluding [0] and [end]), I came up with the equation,
$$newRatio[i] = ogRatio[i] + \frac{\sin{(2\pi\cdot ogRatio[i] + 2\pi t)}}{10}$$
which varies the ratios back and forth slightly with time. sin() and 2*PI*t are used so that the ratios are returned to their original position at
t=1, achieving a loop. This method is implemented in the following code:
class Div {
  ...
  float[] ogSplitRatios;  // originally created splitRatios

  void split(int nPieces) {
    ...
    ogSplitRatios = splitRatios.clone();
  }

  void adjustRatios() {
    // Adjust childRatios using sin function
    // First and last values must remain 0 and 1
    // Inner values must not overlap nor cross 0,1
    if (children.size() != 0) {  // if has children
      for (int i = 1; i < ogSplitRatios.length-1; i++) {
        splitRatios[i] = ogSplitRatios[i] +
                         sin(2*PI*ogSplitRatios[i] + 2*PI*t)/10;
      }
    }
  }
}
Note that in our split() method, we must clone splitRatios to record the original values (before we change them with adjustRatios()). Now we
need to write one final method, updatePosition(). This method will be used to recursively adjust and update the positions of our divs. For a given div, we will (1)
call adjustRatios(), (2) update its position using the coordinates and splitRatios of its parent, and (3) call updatePosition() for its children. This method
is implemented below:
void updatePosition() {
  // Updates position of all divs dynamically

  adjustRatios();  // adjust child ratios

  // update position based on location and ratios recorded in parent
  if (layer != 0) { // if not first layer
    if (!splitAxis) {  // parent split along x
      x1 = parent.x1 + parent.splitRatios[childID]*(parent.x2 parent.x1);
      x2 = parent.x1 + parent.splitRatios[childID+1]*(parent.x2-parent.x1);
      y1 = parent.y1;
      y2 = parent.y2;
    } else {  // parent split along y
      x1 = parent.x1;
      x2 = parent.x2;
      y1 = parent.y1 + parent.splitRatios[childID]*(parent.y2-parent.y1);
      y2 = parent.y1 + parent.splitRatios[childID+1]*(parent.y2-parent.y1);
    }
  }

  for (Div child : children) {  // iterate recursively
    child.updatePosition();
  }
}
Now we can update our main script to add in the time variable and a updatePosition() call, and run!
float border = 50;  // border between main div and frame edge
Div div1;  // initialize first div

int nFrames = 200;  // number of animation frames
float t;  // global time variable

void setup() {
  size(800, 800, P2D);
  // construct first div
  div1 = new Div(border, border, height-border, width-border);

  for (int i = 0; i < 20; i++) {
    div1.iterate();  // iterate div
  }
}

void draw() {
  // update time with frameCount
  t = float(frameCount-1)/nFrames;

  background(200);
  stroke(0);
  strokeWeight(2);
  fill(255);

  div1.updatePosition();  // update div positions
  div1.render();  // render div
}
Our subdivisions are now dynamic!
Looks good, albeit a bit plain. Let's add some color to fix that.
Finishing Touches
To add color, we can add a couple class properties to store a color list and select a random color. You can select the colors on your own, or grab a palette online. Then we'll add a
fill() call to our render() method.
class Div {
  ...
  // list of possible fill colors
  int[][] colorList = {{185, 225, 220},
                        {243, 129, 129},
                        {117, 108, 131}};
  // select random color
  int[] divColor = colorList[int(random(0,colorList.length))];

  void render() {
    // Draw rectangle
    if (children.size() != 0) {  // if has children, iterate recursively
      for (Div child : children) {  // for each child
        child.render();  // call this method
      }
    } else {  // if no children, draw
      fill(divColor[0],divColor[1],divColor[2]);  // fill with divColor
      rect(x1, y1, x2-x1, y2-y1);
    }
  }
}
Our finished product.
and we're done!
Wrap Up
Wow, that ended up being a lot longer than I originally expected. Props to you if you made it all the way through. Hope you learned something! A file with the complete, final code can be found at this GitHub gist.
There's many ways this code could be augmented and added to. Here's a few ideas that I've had/implemented:
- Add motion blur
- Extrude into 3D by adding a height value (see this Tweet)
- Dynamically change the
strokeWeight()value depending on the layer - Vary the functions used in the
iterate()method and theadjustRatios()method - Change div colors based on their parent's color
- Use shapes other than squares/rectangles
- Cycle div contents recursively (see this Tweet)